This page is going to be an in-depth, highly technical explanation of how all the different pieces of Accuracy all work together for weapons in Deep Rock Galactic. Currently unfinished, but it will be as up-to-date as possible. What will be described on this page explains how Accuracy works if the player is standing still. There are additional penalties to accuracy while moving, but this topic is already complex enough without having to account for them.
Overview
In the most abstract terms, Accuracy has two moving parts: the "crosshair" section1 that governs where pellets can be fired when the trigger gets pulled, and the "recoil" section that determines how far the crosshair gets displaced from the Original Aim Axis. At the start of the firing sequence, there is no Recoil so the center of the crosshair is perfectly aligned with the Original Aim Axis.
For the majority of hitscan weapons2, firing a shot causes the game to get the current horizontal and vertical sizes of the crosshair and use them to create a bounding ellipse. All pellets fired per shot start with their trajectories perfectly aligned to the center of the ellipse, and then they get randomly displaced to anywhere within the bounding ellipse. The game does not favor putting the pellets closer to the center of the ellipse; it is a true RNG roll for each individual pellet.
If the current Total Recoil is greater than zero, then the game first displaces the center of the bounding ellipse (previously referred to as "crosshair") from the Original Aim Axis before performing its bounding ellipse creation and random pellet distribution.
1. NOTE: what is referred to as the "crosshair" section is not referring to the crosshairs displayed on-screen in the player's HUD. Those are just approximations to help the player aim; they are not representative of internal values.
2. Autocannon, Boomstick, and Zhukovs are the three exceptions. They all use rectangular bounding regions, instead of ellipses.
Definition of Terms
- "Base Spread": the minimum bounding region (either ellipse or rectangle) across which pellets can be randomly distributed
- "Current Spread": this can only have a value between zero and Spread Variance, and is the current value of units that are added to Base Spread when the game fetches what the current Horizontal and Vertical Spread values are.
- "Spread per Shot": every time a shot is fired, this value will be added to Current Spread (cannot surpass Spread Variance)
- "Spread Recovery Speed": if Current Spread is greater than zero (as in, at least one shot has been fired recently), then this is the value of how many Spread Units are subtracted per second from Current Spread until it returns to zero
- "Spread Variance": this value governs the maximum bounding region size such that neither its vertical nor horizontal values can surpass Base Spread + Spread Variance. If a shot gets fired and the added Spread per Shot would make Current Spread exceed Spread Variance, Current Spread instead just gets set to the max value and some of the Spread per Shot is lost.
- "Spread Curve": certain weapons have a function that converts the current Spread values from linear, intuitive functionality into non-linear outputs. It can be conceptualized as changing "Total Spread = Base Spread + Current Spread" to "Total Spread = Base Spread + SpreadCurve(Current Spread)"
- "Original Aim Axis" (OAA): before the first shot gets fired, the Original Aim Axis is the center of the player's screen (and by extension the crosshair displayed on the HUD). The OAA is the axis to which Recoil is perpetually trying to return. The OAA remains stationary relative to the player's HUD whenever Total Recoil is greater than zero such that moving the crosshair down to counteract recoil also moves OAA down, and when the Recoil is falling off the crosshair will fall back down to where the OAA has moved to.
- "Recoil per Shot": every shot fired by hitscan weapons has an associated recoil value that displaces the center of the bounding region by a small amount and then returns back to zero over time.
- "Total Recoil": this is a rolling sum of all Recoil per Shots as time progresses. If only one shot was fired, then Total Recoil would be identical to one Recoil per Shot. However, if shots are fired faster than the Recoil per Shot can recover, then Total Recoil will continue to rise until it reaches an equilibrium where the amount of recoil being shed by the sum of all Recoil per Shots is equal to amount of recoil being gained by the next shot.
Spread
Spread Variables Used
All of these variables can be found in the HitscanBaseComponent object associated with each weapon.
- MaxHorizontalSpread
- MaxVerticalSpread
- SpreadPerShot
- SpreadRecoveryPerSecond
- MinSpread
- MaxSpread
Spread Equations Used
Horizontal Base Spread = MaxHorizontalSpread
Vertical Base Spread = MaxVerticalSpread
Spread Variance = MaxSpread - MinSpread
Current Spread after firing a shot = min(Current Spread + Spread per Shot, Spread Variance)
Current Spread(t) while Current > Base = max(Base Spread, Current Spread - Spread Recovery Speed * t)
Converting Spread Units to Degrees
TODO: still need to figure out how to convert from abstract Spread Units into radians of deviation for bounding regions
Spread Full Model
- The player presses the Fire button
- The game fetches the current values of Horizontal Base Spread + Current Spread and Vertical Base Spread + Current Spread, and uses them to form a bounding region (either ellipse or rectangle). If the weapon has a Spread Curve, it changes the lookup to Base Spread + SpreadCurve(Current Spread)
- All pellets to be fired for this shot have their trajectories randomly displaced within the bounding region and then their hitscan collisions get checked
- The game tries to add the Spread per Shot to the Current Spread value. If that causes Current Spread to exceed the Spread Variance value, Current Spread gets set to Spread Variance instead.
- If Current Spread > 0 (equivalent to Current Spread + Base Spread > Base Spread), then the game starts subtracting Spread Recovery Speed units per second from Current Spread
- Repeat steps 1-5 for every shot in the magazine
- After enough time has passed, Spread Recovery Speed will reduce Current Spread all the way to zero, bringing the Total Spread back down to Base Spread.
Recoil
DRG has modeled the recoil of their guns to use a Critically Damped Harmonic Oscillator function.
Recoil Variables Used
All of these variables can be found in the RecoilSettings property of the AmmoDrivenWeapon object associated with each weapon.
- Mass
- SpringStiffness
- RecoilPitch
- RecoilYaw
- CanRecoilDown
NOTE: CanRecoilDown is only true for Minigun, Autocannon, and Zhukovs. For all other weapons, the recoil can only go up, left, or right.
Recoil Equations Used
Natural Frequency
- Let Mass be represented by 'M'
- Let SpringStiffness be represented by 'S'
\[\omega_{n} = \sqrt{\frac{S}{M}}\]
Total Initial Velocity
- Let RecoilPitch be represented by 'V'
- Let RecoilYaw be represented by 'H'
\[v_{i} = \sqrt{V^{2} + H^{2}}\]
Recoil per Shot over time
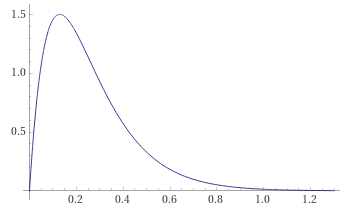
\[R(t) = e^{-\omega_{n}*t} * (v_{i} * t)\]
NOTE: this equation returns the degrees of deviation of how far the center of the crosshair should move away from the OAA for this shot.
Example plot using Subata's default variables:
Maximum Recoil per Shot
\[Max = R(\frac{1}{\omega_{n}})\]
Time for Recoil per Shot to reach 0.1
\[End = \frac{-W_{-1}[\frac{-\omega_{n} * 0.1}{v_{i}}]}{\omega_{n}}\]
NOTE: the \[W_{-1}[]\] is shorthand for the LambertW function using k=-1
Recoil Full Model
- A shot is fired
- RecoilPitch is fetched and chooses between the up and down direction (if CanRecoilDown=True, else only up direction can be chosen), and RecoilYaw is fetched and chooses between either left or right direction.
- Using RecoilPitch, Mass, and SpringStiffness a Recoil(t) function is made to track the vertical recoil of the shot that was just fired. Similarly, RecoilYaw is used in a Recoil(t) function to track the horizontal recoil.
- The Total Vertical Recoil and Total Horizontal Recoil values start tracking their new Recoil(t) functions, respectively, and add the current degrees of deviation to their totals.
- When Recoil(t) falls below a certain value (modeled as 0.1), the two Total Recoil trackers discard that function from their running sums.
- The player's HUD is moved off of the OAA vertically by Total Vertical Recoil degrees and horizontally by Total Horizontal Recoil degrees. This has the added effect of moving the weapon's crosshair center off of the OAA too.
- Repeat steps 1-6 for every shot in the magazine
- After enough time has passed, all of the individual Recoil(t) functions will have fallen below the threshold (0.1 in this model) and both Total Recoil values will return to zero, also returning the HUD to the OAA.
Internal values per weapon
Table of baseline values
Disclaimer: these values were last updated using Update 31, Hotfix 5.
| Weapon Name | MaxHorizontalSpread | MaxVerticalSpread | SpreadPerShot | SpreadRecoveryPerSecond | MinSpread | MaxSpread | RecoilPitch | RecoilYaw | Mass | SpringStiffness | CanRecoilDown |
|---|---|---|---|---|---|---|---|---|---|---|---|
| Subata | 1.5 | 1.5 | 1.5 | 7.5 | 0 | 3 | 30 | 10 | 1 | 60 | False |
| Shotgun | 12 | 6 | 0 | 12 | 6 | 8 | 55 | 40 | 4 | 75 | False |
| SMG | 3 | 3 | 1.5 | 10 | 0 | 4 | [35, 45] | 7 | 1 | 40 | False |
| Minigun | 5 | 5 | 0.2 | 1 | 0 | 3.5 | 10 | 10 | 1 | 150 | True |
| Autocannon | 22 | 8 | 0 | 5 | 0 | 0 | 30 | 40 | 1 | 200 | True |
| Revolver | 1.5 | 1.5 | 7 | 6 | 0 | 8 | 130 | 10 | 2 | 65 | False |
| BRT | 2.25 | 2.25 | 1.2 | 5 | 0 | 4 | 30 | 10 | 1 | 70 | False |
| GK2 | 0.9 | 0.9 | 1.4 | 8.1 | 0 | 4.2 | 35 | 5 | 1 | 50 | False |
| M1000 | 1 | 1 | 3 | 8.5 | 0 | 5 | 50 | 5 | 4 | 70 | False |
| Boomstick | 35 | 10 | 0 | 5 | 0 | 5 | 120 | 10 | 2 | 100 | False |
| Zhukovs | 36 | 5 | 0 | 30 | 0 | 20 | 20 | 20 | 1 | 100 | True |
Tables of mods' and overclocks' effects
Disclaimer: these values were last updated using Update 31, Hotfix 5.
Subata
| Upgrade Name | Upgrade Effects |
|---|---|
| T1.A "Improved Alignment" | x0 MaxHorizontalSpread x0 MaxVerticalSpread |
| T3.B "Recoil Compensator" | -0.3 SpreadPerShot x0.5 RecoilPitch x0.5 RecoilYaw |
| OC "Automatic Fire" | x2.0 MaxHorizontalSpread x2.0 MaxVerticalSpread x2.5 RecoilPitch x2.5 RecoilYaw |
Shotgun
| Upgrade Name | Upgrade Effects |
|---|---|
| T2.C "Choke" | x0.5 MaxHorizontalSpread x0.5 MaxVerticalSpread |
| T3.A "Recoil Dampener" | x0.4 RecoilPitch x0.4 RecoilYaw |
| OC "Magnetic Pellet Alignment" | x0.5 MaxHorizontalSpread x0.5 MaxVerticalSpread |
| OC "Cycle Overload" | x1.5 MaxHorizontalSpread x1.5 MaxVerticalSpread |
| OC "Mini Shells" | x0.5 RecoilPitch x0.5 RecoilYaw |
SMG
| Upgrade Name | Upgrade Effects |
|---|---|
| T2.B "Recoil Dampener" | x0.5 RecoilPitch x0.5 RecoilYaw |
| OC "Super-Slim Rounds" | x0.8 MaxHorizontalSpread x0.8 MaxVerticalSpread |
| OC "EM Refire Booster | x1.5 MaxHorizontalSpread x1.5 MaxVerticalSpread |
Minigun
| Upgrade Name | Upgrade Effects |
|---|---|
| T1.C "Improved Platform Stability" | x0.2 MaxHorizontalSpread x0.2 MaxVerticalSpread |
| OC "Exhaust Vectoring" | x2.5 MaxHorizontalSpread x2.5 MaxVerticalSpread |
| OC "Bullet Hell" | x6.0 MaxHorizontalSpread x6.0 MaxVerticalSpread |
Autocannon
| Upgrade Name | Upgrade Effects |
|---|---|
| T2.A "Tighter Barrel Alignment | x0.7 MaxHorizontalSpread x0.7 MaxVerticalSpread |
| OC "Big Bertha" | x0.7 MaxHorizontalSpread x0.7 MaxVerticalSpread |
Revolver
| Upgrade Name | Upgrade Effects |
|---|---|
| T1.B "Perfect Weight Balance" | x0.3 MaxHorizontalSpread x0.3 MaxVerticalSpread |
| T2.B "Floating Barrel" | -5.6 SpreadPerShot x0.75 RecoilPitch x0.75 RecoilYaw |
| T5.A "Dead-Eye" | Removes movement penalty |
| OC "Six Shooter" | x1.5 MaxHorizontalSpread x1.5 MaxVerticalSpread |
| OC "Elephant Rounds | x0.5 MaxHorizontalSpread x0.5 MaxVerticalSpread +5 SpreadPerShot +4 MaxSpread x1.5 RecoilPitch x1.5 RecoilYaw +3.5 Mass |
BRT
| Upgrade Name | Upgrade Effects |
|---|---|
| T1.B "Floating Barrel" | x0.7 MaxHorizontalSpread x0.7 MaxVerticalSpread x0.6 SpreadPerShot |
| T2.A "Recoil Dampener" | x0.5 RecoilPitch x0.5 RecoilYaw |
| OC "Micro Flechettes" | x0.5 SpreadPershot x0.5 RecoilPitch x0.5 RecoilYaw |
| OC "Lead Spray" | x4.0 MaxHorizontalSpread x4.0 MaxVerticalSpread |
GK2
| Upgrade Name | Upgrade Effects |
|---|---|
| T1.A "Gyro Stabilization" | x0 MaxHorizontalSpread x0 MaxVerticalSpread |
| T3.A "Floating Barrel" | x0.5 RecoilPitch x0.5 RecoilYaw |
| T5.B "Battle Cool" | Sets SpreadRecoveryPerSecond = 100 for 1.5 sec after kill |
| OC "Compact Ammo" | x0.7 RecoilPitch x0.7 RecoilYaw |
| OC "Overclocked Firing Mechanism" | x2.5 RecoilPitch x2.5 RecoilYaw |
| OC "AI Stability Engine" | +9 SpreadRecoveryPerSecond x0 RecoilPitch x0 RecoilYaw |
M1000
| Upgrade Name | Upgrade Effects |
|---|---|
| T2.B "Better Weight Balance" | -0.9 SpreadPerShot x0.8 MaxSpread x0.5 RecoilPitch x0.5 RecoilYaw |
| OC "Hipster" | -0.3 SpreadPerShot x0.85 MaxSpread x0.5 RecoilPitch x0.5 RecoilYaw |
Boomstick
| Upgrade Name | Upgrade Effects |
|---|---|
| OC "Shaped Shells" | x0.65 MaxHorizontalSpread x0.65 MaxVerticalSpread |
Zhukovs
| Upgrade Name | Upgrade Effects |
|---|---|
| T3.B "Better Weight Balance" | x0.5 MaxHorizontalSpread x0.5 MaxVerticalSpread |
| OC "Gas Recycling" | x1.5 MaxHorizontalSpread x1.5 MaxVerticalSpread |
List of all known Spread Curves
Minigun
Revolver
GK2

M1000